Note
Access to this page requires authorization. You can try signing in or changing directories.
Access to this page requires authorization. You can try changing directories.
This article describes how to test small form factor deployments of Azure Local in a Hyper-V virtual machine (VM).
Note
- Virtual machines (VMs) only support testing and evaluation scenarios. Running Azure Local small form factor deployments on VMs for production use isn't supported.
- If you plan to run production workloads, deploy on a supported physical device. For a list of supported hardware, see Supported devices for small form factor deployments.
If you don’t have access to physical hardware, you can use a Hyper-V VM to test these deployments. You can also follow this approach in an Azure Virtual Machine, though additional workaround steps are required as described later in this article.
While a VM is useful for testing, it doesn’t fully replicate bare-metal hardware behavior. For the most accurate representation of a customer deployment, use a supported physical device. For more information, see Install the maintenance environment on your machine.
Important
This feature is currently in PREVIEW. See the Supplemental Terms of Use for Microsoft Azure Previews for legal terms that apply to Azure features that are in beta, preview, or otherwise not yet released into general availability.
Prerequisites
Before you start, make sure you have:
- Completed Subscription setup.
- A Windows machine with Hyper-V support and administrator access.
- Internet access from the Windows host.
- Enough local storage for a 256 GB virtual hard disk.
- The ability to run PowerShell as an administrator.
Tip
If you're running Hyper-V inside an Azure Virtual Machine, choose a VM size that supports nested virtualization.
Install Hyper-V
Open Turn Windows features on or off from the Start menu.

Select Hyper-V and make sure the child features are selected too.

Restart the device if Windows prompts you to do so.


Download the ISO and Configurator App
Download these two artifacts from the Azure portal:
| Download | Description |
|---|---|
| Maintenance OS | Installs the maintenance environment used during testing. |
| Configurator App | Lets you connect to the VM, download the ownership voucher, and collect logs. |
To download them:
Go to the Azure portal.
Select Azure Arc > Operations > Machine Provisioning (preview) > Get started > View downloads.
Select Download all.
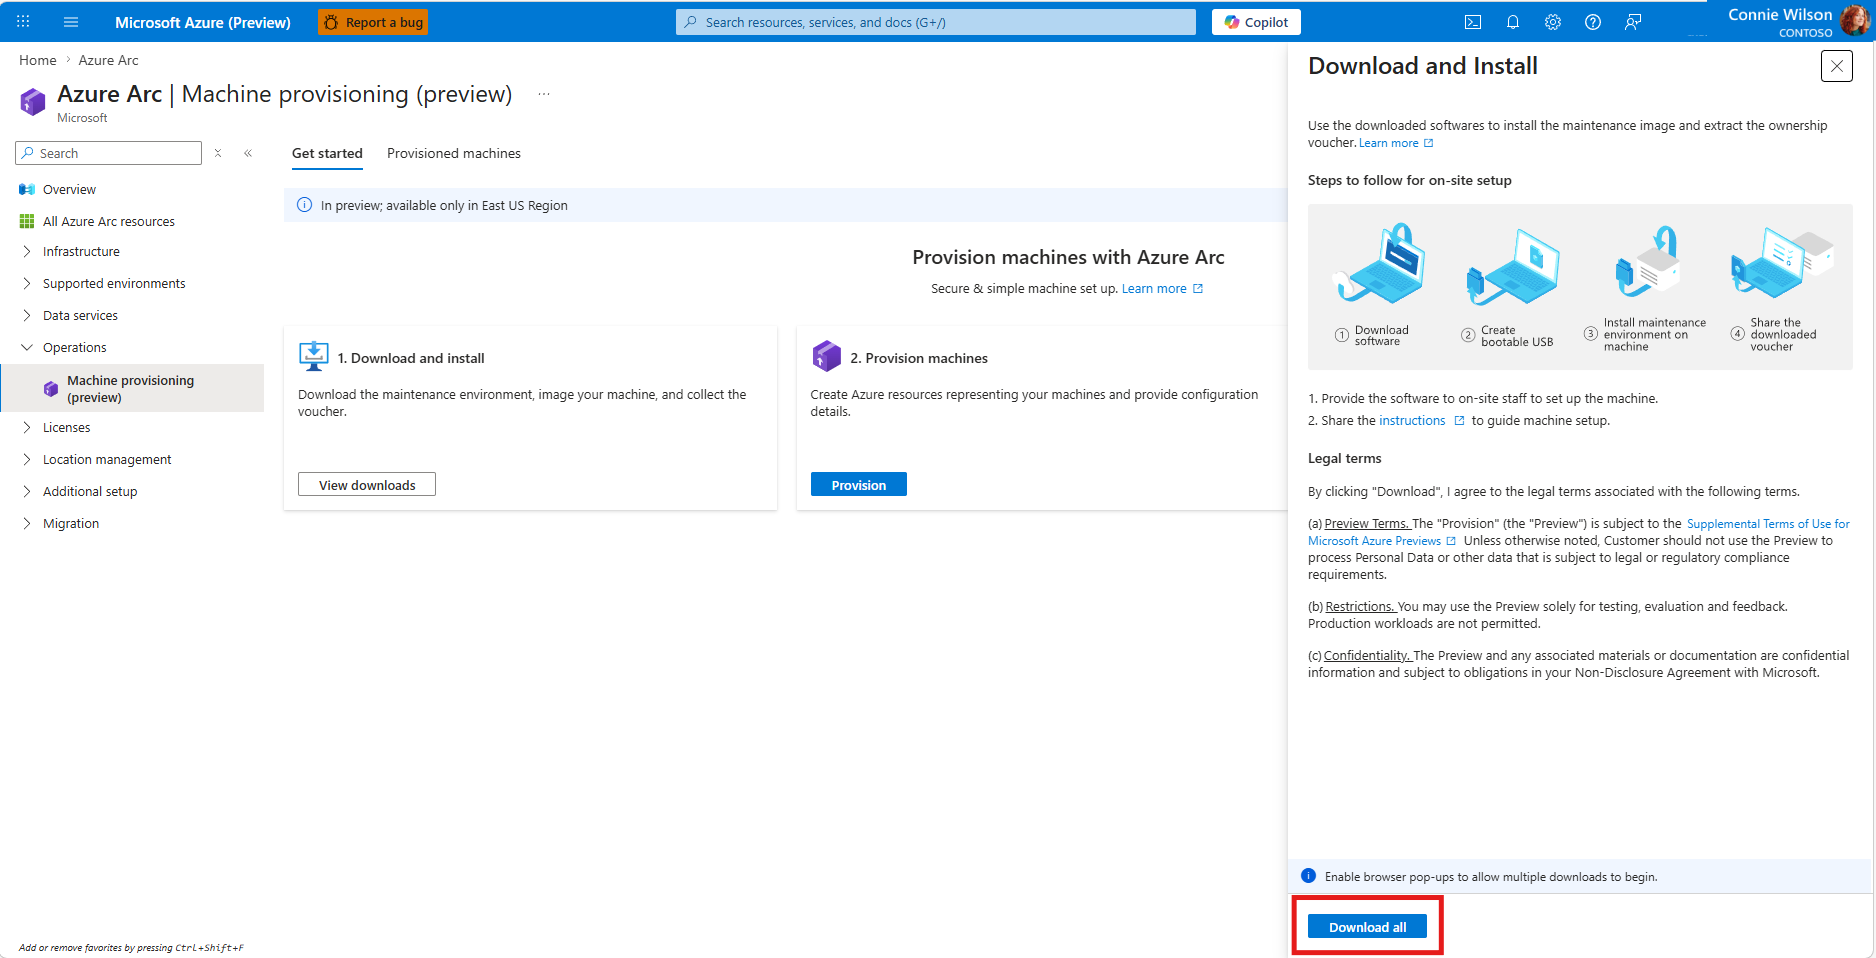
Note
- Leave the ISO in your Downloads folder. The ISO is needed for creating the VM.
- Make sure your browser allows multiple downloads. Each file downloads separately.
Create the virtual network
The VM needs a network that:
- Provides DHCP for the initial connection
- Supports assigning a static IP address later
- Has internet connectivity
To simplify setup, use the provided script to create the Hyper-V switch, configure NAT, and enable DHCP.
Run the network configuration script
Download
set-network.ps1.Save the script locally.
Open PowerShell and allow the script to run for the current session:
Set-ExecutionPolicy -Scope Process -ExecutionPolicy Bypass -ForceRun the script:
.\set-network.ps1Tip
The script is idempotent. You can rerun it if setup is interrupted or if you need to repair the Hyper-V switch, NAT, or DHCP configuration. Repeat runs converge on the same network configuration instead of creating duplicate resources.
Apply the Azure Virtual Machine workaround if needed
If you're creating the Hyper-V environment inside an Azure Virtual Machine, block access to Azure Instance Metadata Service (IMDS) from the guest VM. That prevents the test VM from trying to use the host VM identity.
Run these commands after you create the VM, but before you start it for the first time:
$adapter = (Get-VMNetworkAdapter -VMName "<your-vm-name>")[0]
Add-VMNetworkAdapterAcl -VMNetworkAdapter $adapter -Action Deny -Direction Inbound -RemoteIPAddress "169.254.169.254"
Add-VMNetworkAdapterAcl -VMNetworkAdapter $adapter -Action Deny -Direction Outbound -RemoteIPAddress "169.254.169.254"
Create the Hyper-V virtual machine
Open Hyper-V Manager.
Select your local machine, then select New > Virtual Machine.
In the Virtual Machine Wizard, configure the following settings:
Specify Name and Location: Enter a name of your choice (for example,
linuxsff-vm).Specify Generation: Select Generation 2.
Assign Memory: Set the startup memory to 16000 MB.
Configure Networking: Select the virtual network switch created earlier. By default, the provided script names this switch
HV-Internal-NAT.Create a New Virtual Hard Disk: Create a new virtual hard disk with 256 GB of storage.
Installation Options: Select Install an operating system from a bootable CD/DVD-ROM and choose the ROE image file downloaded in Prepare the ROE Image.
After verifying your choices in the Summary page, select Finish.
Update the VM settings
In Hyper-V Manager, right-click the VM, then select Settings.
Change these settings:
- Under Security, clear Enable Secure Boot and select Enable Trusted Platform Module.
- Under Processor, set the virtual processor count to at least
4.
Select Apply, then OK.
Download the ownership voucher
Note
If you're running Hyper-V inside an Azure Virtual Machine, apply the Azure Virtual Machine workaround before starting the VM.
Start the VM and wait about five minutes.
Select Connect in Hyper-V Manager to open the console.
Wait for the message [Succeeded] ROE setup completed successfully.

Tip
If you see either success message, the maintenance environment is ready. You don't need to press Enter or sign in before downloading the ownership voucher.
Keep the console open so you can reference the VM IP address.
Open Configurator App.
Enter the VM IP address and select Next.
Enter the username
edgeuserand select Next.Select Password as the authentication method, enter
Password1, and select Sign in.Select Download Ownership Voucher.

Save the
.pemfile to a local folder.


Troubleshoot
To troubleshoot VM setup, see Troubleshoot small form factor deployments of Azure Local.
Review your VM setup
Before you continue, confirm that:
- Hyper-V is installed.
- The VM is Generation 2, has TPM enabled, has Secure Boot disabled, and has at least 4 virtual processors.
- The VM booted the Maintenance OS successfully.
- You downloaded the ownership voucher and stored it securely.
Next steps
- Continue to Connect a provisioned machine from the Azure portal.