Note
Access to this page requires authorization. You can try signing in or changing directories.
Access to this page requires authorization. You can try changing directories.
This article describes how to install the maintenance environment for small form factor deployments of Azure Local on supported hardware and extract the ownership vouchers required to connect your machine to Azure. The maintenance environment is a restricted operating system that supports Azure-based management of the machine, once it registers with Azure.
If you don't have access to physical hardware, you can test in a Hyper-V virtual machine (VM). For more information, see Test small form factor deployments of Azure Local in a Hyper-V virtual machine.
Important
This feature is currently in PREVIEW. See the Supplemental Terms of Use for Microsoft Azure Previews for legal terms that apply to Azure features that are in beta, preview, or otherwise not yet released into general availability.
Prerequisites
Set up your subscription and make sure you have the following items.
Important
If your environment uses firewall restrictions, review Outbound connectivity before you start.
Hardware
Use one of these supported devices:
- ASUS NUC 14 Pro
- ASUS NUC 15 Pro
- Lenovo ThinkEdge SE30
- Lenovo ThinkEdge SE100
- OnLogic HX521
- OnLogic K521
Note
Securing the Baseboard Management Controller (BMC) is essential to protect the integrity of your hardware and the systems running on it. Always set a strong, unique password and replace any default credentials immediately. Keep the BMC off untrusted or public networks, and place it instead on a restricted, dedicated management network with strict access controls. Because BMC implementations can vary across manufacturers, consult your hardware vendor for their specific security guidance and best practices to ensure your environment is fully protected.
Software and tools
- A Windows PC with internet access and a USB port
- Rufus 4.12
Tip
Use only Rufus. Other USB creation tools can leave the drive in a read-only state, which can prevent ownership voucher extraction.
Additional equipment
- A USB flash drive with at least 8 GB of capacity
- A USB keyboard
- An HDMI cable and monitor
- A direct Ethernet connection with internet access
Download the maintenance OS ISO and Configurator App
Download the following artifacts from the Azure portal:
| Download | Description |
|---|---|
| Maintenance OS | Installs the maintenance environment that remains on the device and supports lifecycle operations. |
| Configurator App | Lets you connect to a device from Windows to diagnose issues, collect logs, and download ownership vouchers. |
To download the files:
In the Azure portal, select Azure Arc > Operations > Machine Provisioning (preview) > Get started > View downloads.
In the Download and Install pane, review the terms, and select Download all.
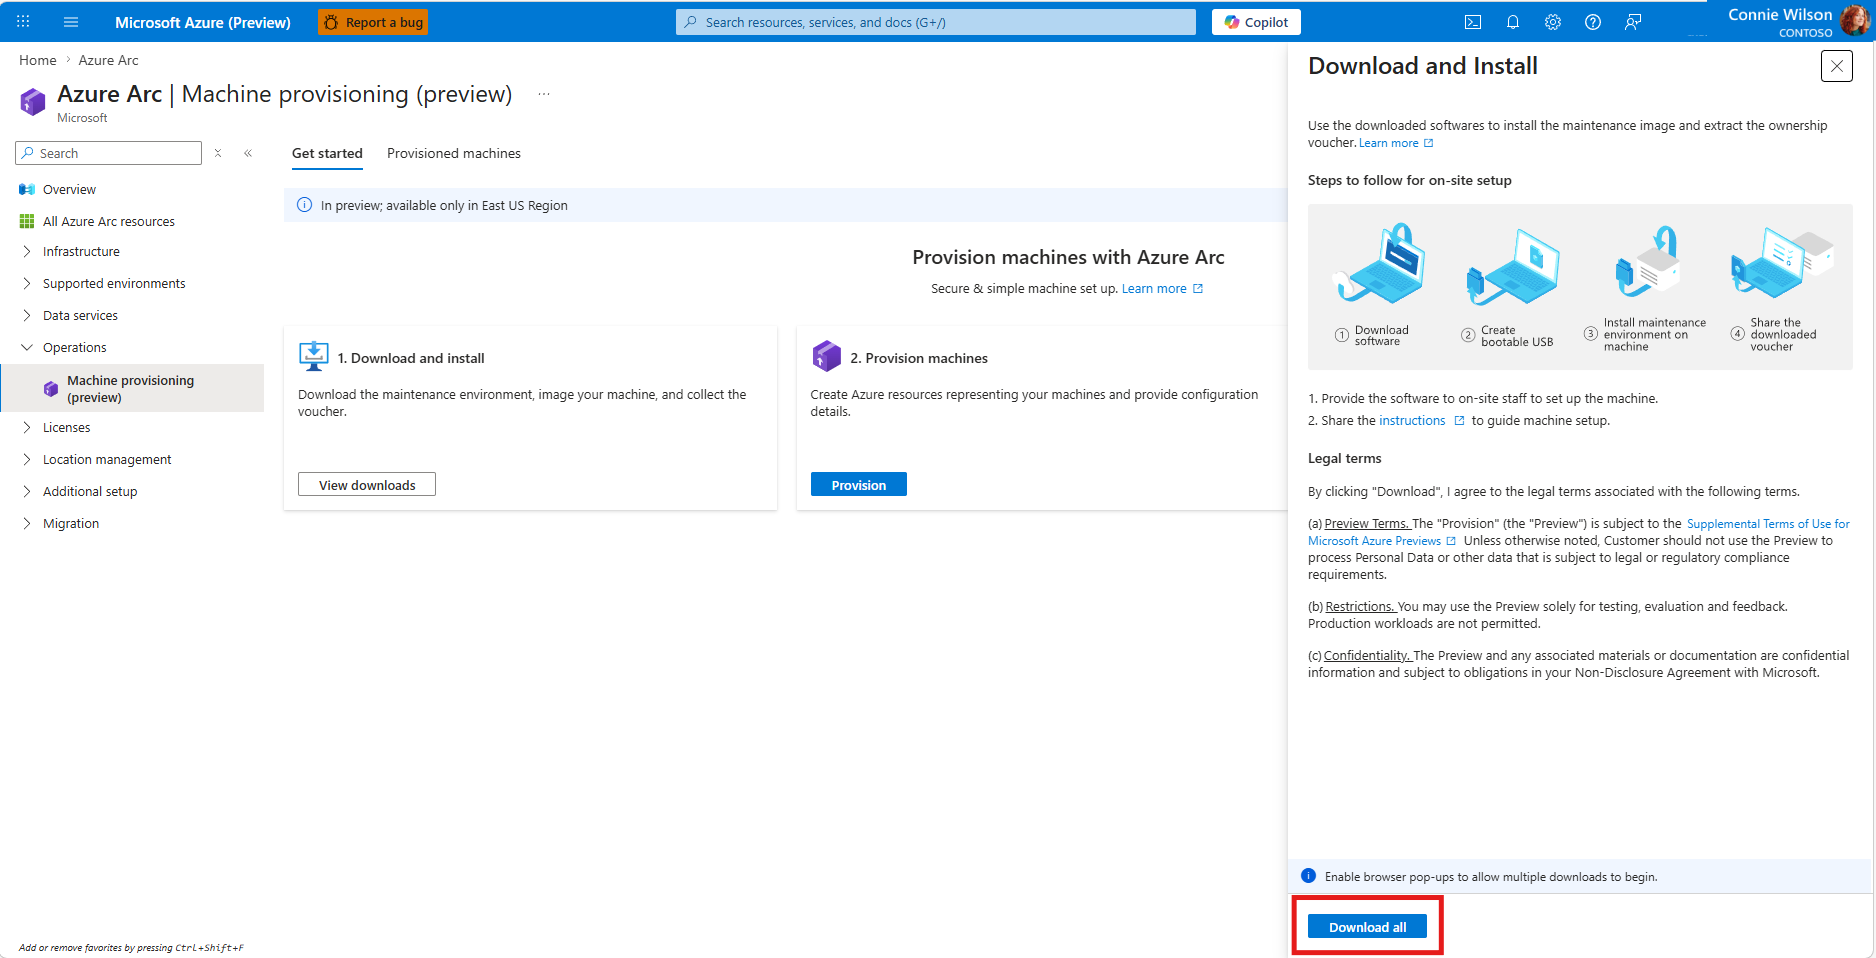
Wait for the downloads to complete. For the Configurator App, select Open or Save as if your browser prompts you.
Note
Make sure your browser allows multiple downloads. Each file downloads separately.
Extract the downloaded archive to access the
provision-os.isofile.
Create a bootable USB drive
Connect the USB flash drive to your Windows PC.
Open Run from the Start menu.
Enter
rufus, then select OK.Note
If Rufus isn't installed, download it from the Rufus download page.
In Rufus, configure the following settings:
- Device: Your USB drive
- Boot selection: The downloaded ISO file
- Partition scheme: Default
- File system: Default
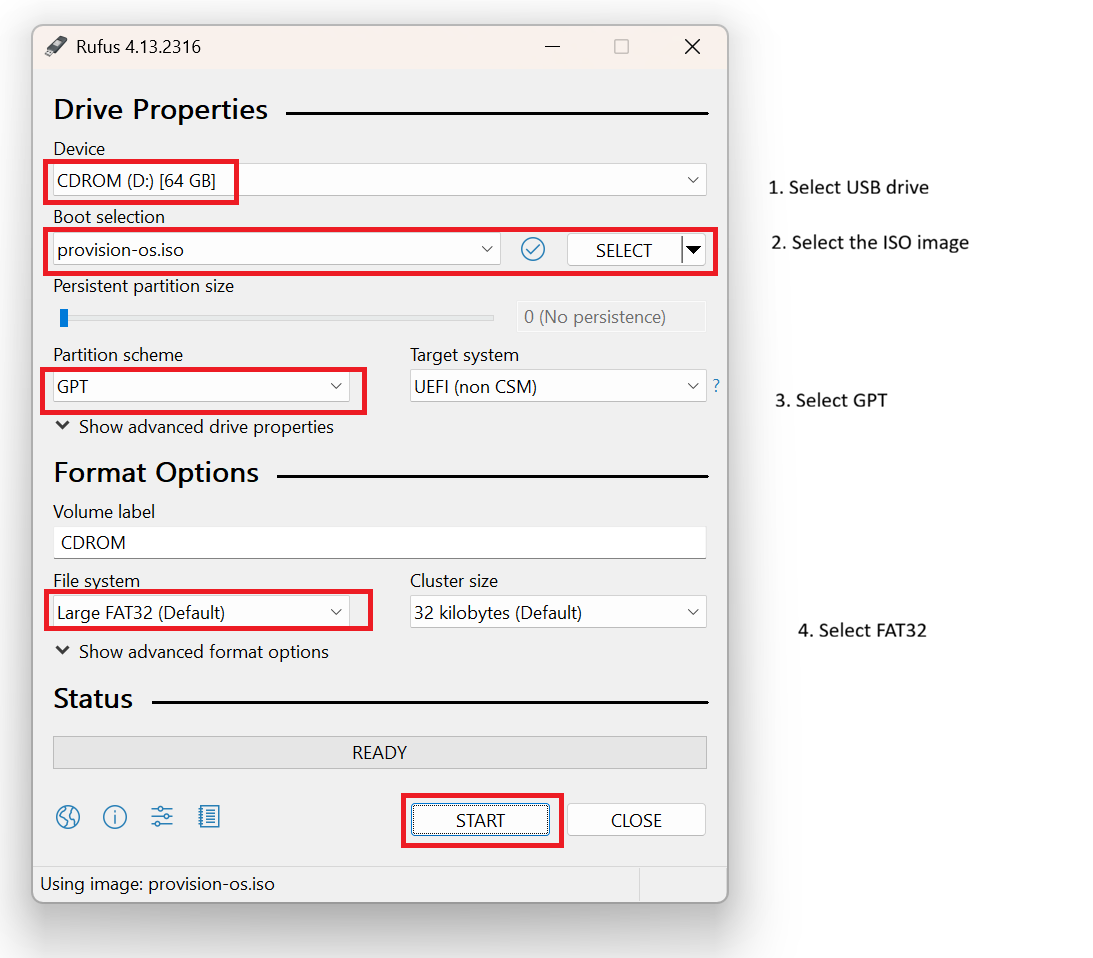
Select START.
If prompted, choose Write in ISO image mode.
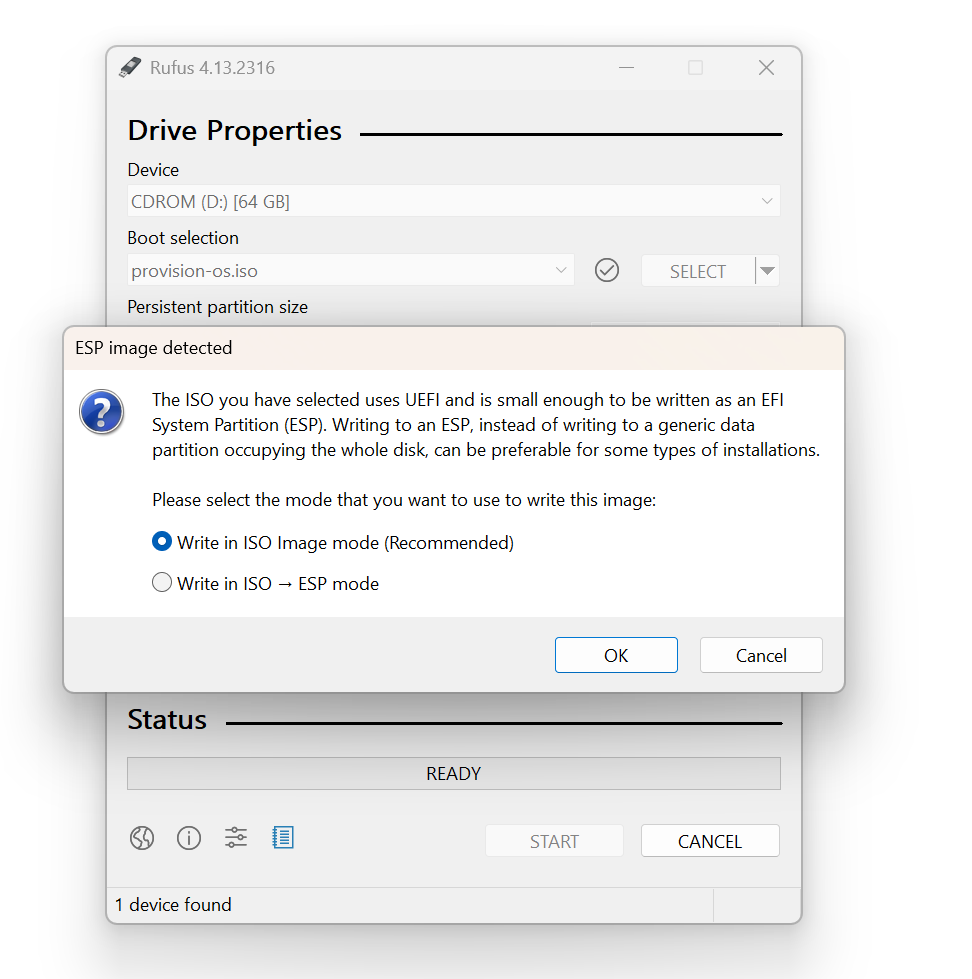
Wait for the process to complete, and then safely eject the USB drive.
Prepare the physical device
Make sure the device can access a network with internet connectivity.
If you plan to assign static IP addresses later, reserve the required IPs on the network.

Connect the Ethernet cable to the device.
Connect power and turn on the device.

Install the maintenance environment
Boot from the USB drive
- Connect a monitor and USB keyboard to the target machine.
- Insert the bootable USB drive.
- Connect the Ethernet cable.
- Power on the device.
- Repeatedly press the boot menu key:
- ASUS NUC devices: F10
- Lenovo devices: F12
- From the boot menu, select the USB drive (usually labeled with
UEFI:).
Complete the maintenance environment installation
- Wait for the installer to start.
- Allow the installation to complete automatically.
- Don't sign in during the process.
- Wait for the message
Status: [Succeeded] Maintenance environment setup completed successfully. - Remove the USB drive after the installation finishes.
Note
Installation typically takes about five minutes and includes an automatic reboot.
Extract ownership vouchers
The ownership voucher is a .pem file that proves the identity of the machine when you connect the provisioned machine to Azure from the Azure portal. In the portal deployment flow, this file is generated during installation and then made available either on the USB drive or on the device, depending on whether a USB drive is present when the voucher is written.
Use the .pem file in the next step when you connect the provisioned machine from the Azure portal. Treat this file as required deployment material for that machine.
If the .pem file is lost before you connect the machine to Azure, you can't recreate or redownload the same voucher later. In that case, you must redeploy the operating system on the machine to generate a new ownership voucher.
By default, the ownership voucher is written to your USB drive, and the local file on the device is then deleted for security. In that case, obtain the voucher by copying it from the USB drive.
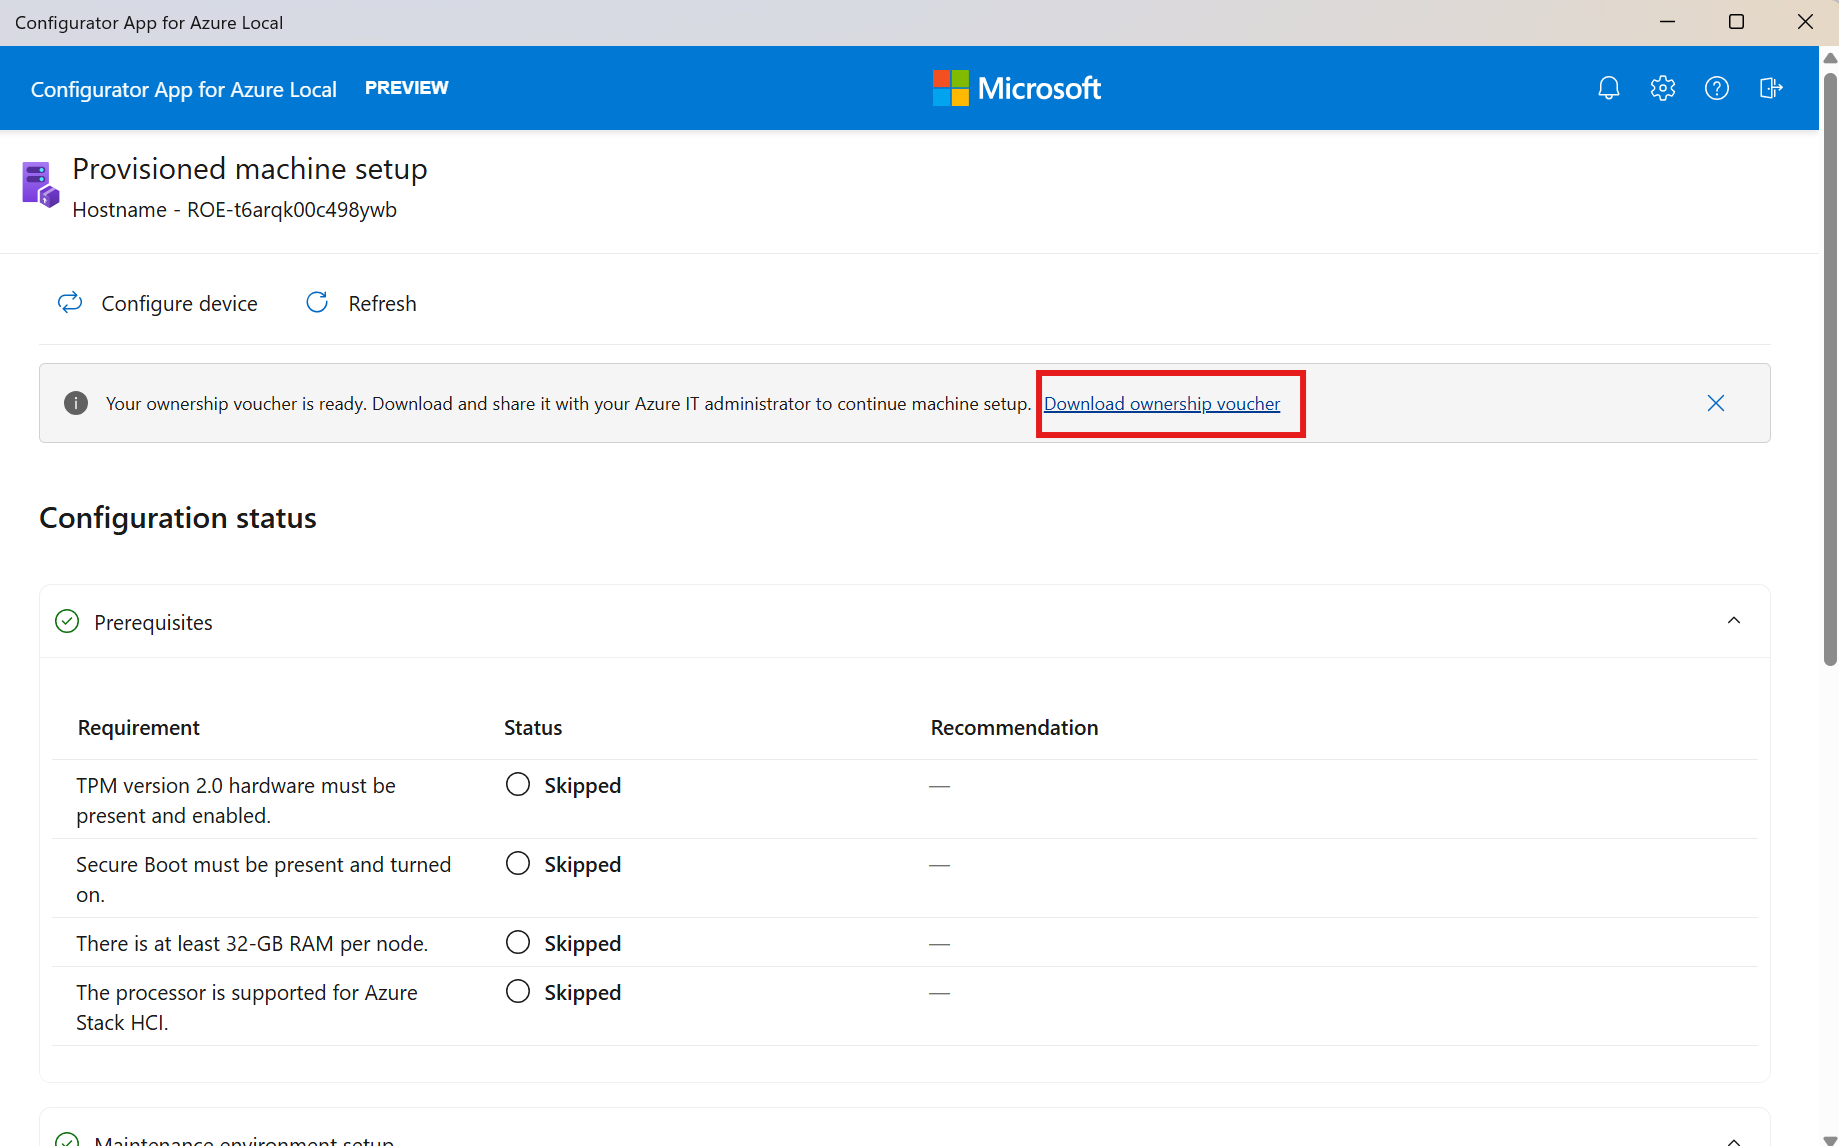
If no USB drive is present when the voucher is written, the voucher remains on the device. In that case, you can download it by using the Configurator App, SSH, or SCP.
Obtain the ownership voucher in one of the following ways:
- Copy it from the USB drive
- Download it by using the Configurator App
- Download it by using SSH or SCP
Copy the voucher from the USB drive
Use this option for the default flow, where the voucher was written to the USB drive during installation.
- Insert the USB drive into your Windows PC.
- Open the
vouchersfolder. - Open the folder named after the machine's serial number.
- Copy the
.pemfile to a secure location. - Repeat for each machine.
Tip
Store the .pem files in a secure, backed-up location. The .pem files are needed for connecting the machine to Azure.
Important
If you lose the .pem file before you connect the machine to Azure, you must redeploy the operating system on that machine to generate a new ownership voucher.
Review your installation
Before you continue, confirm that:
- The bootable USB drive was created successfully.
- You installed the maintenance environment on the target machines.
- The installation completion message appeared.
- You extracted and securely stored the ownership vouchers.
Next step
- Continue to Connect a provisioned machine from the Azure portal.