Note
Access to this page requires authorization. You can try signing in or changing directories.
Access to this page requires authorization. You can try changing directories.
Human input, review, and action are essential to ensure that automations and AI workflows run effectively and maintain high quality. The request information (RFI) action in agent flows and workflows provides a streamlined way to incorporate human oversight into automated processes.
What is the request information action?
Request information is an action in agent flows and workflows that lets you:
- Pause execution
- Collect input from designated human reviewers before proceeding with subsequent steps
- Use input from human reviewers in subsequent steps
Access request information
The request information action is available in agent flows and workflows. Agent flows and worflows are automations built in Copilot Studio that can be used standalone or integrated with Copilot Studio agents. Learn more about agent flows in the agent flows and workflows overview.
Common use cases for request information
The request information action addresses critical business needs across various industries. There are many scenarios where this action can be used. Here are a few examples:
Insurance claims processing: When automated claim review identifies missing documentation or requires damage assessment details, the RFI action can request specific information from field adjusters, such as repair estimates, photo documentation, or on-site inspection results.
Financial services compliance: During loan applications or account reviews, workflows can pause to request more verification documents from compliance officers, such as income verification, credit assessments, or regulatory approvals.
Supply chain quality control: Manufacturing processes can request inspection reports from quality assurance teams when automated systems detect potential defects or when supplier certifications need human verification.
Legal document review: Contract approval workflows can pause to request legal counsel input on specific clauses, risk assessments, or compliance requirements that require professional judgment.
IT security incident response: Security workflows can automatically request more investigation details from cybersecurity analysts when threat detection systems identify suspicious activities requiring expert analysis.
Set up request information in your agent flow or workflow
There are a few steps to set up and test the request information action in your agent flow or workflow.
Add request information in your agent flow or workflow
If you don't have an existing agent flow or workflow for this action, start by creating a new agent flow or workflow:
Log into Copilot Studio at
copilotstudio.microsoft.com.Select Flows from the left navigation to access the Workflows page.
Select New agent flow or New workflow.
Add a trigger to your flow or workflow.
If you already have an agent flow or workflow and want to add this action, open your existing agent flow or workflow in the flow designer and continue with the following steps:
In the flow designer, add a new Request for information action at the location where you want to add the request for information action:
- In agent flows, select Insert a new action where you want to add the action, and select Request for information under Human review.
- In workflows, select Add a step where you want to add the action, search for Human review, and select Request for information.
On the canvas, select your Request for information node to open the configuration pane and configure the following required fields:
- Title: The subject line of the email that is sent with the request. Example: "Missing Information on Claim with ID: ABC123"
- Message: The message or note that accompanies the request for information. Example: "This request is being sent to you because... Provide this information at your earliest convenience."
- Assigned to: The email addresses of individuals who receive the request. You can enter multiple emails, however, the response from the first person to respond is used.
Important
- The response from the first person to respond is used in the flow. Subsequent responses aren't processed.
- All requests are currently sent via Outlook only. More platforms might be added in the future.
- Requests can't be sent to users outside of your tenant.
For workflows, you also need to configure a connection.
Select Add an input.
Add your first input by selecting one of the available input types.
Five input types are currently supported:
- Text (string)
- Yes/No (Boolean)
- Email (email address)
- Number (integer)
- Date (date)

Inputs offer flexibility with options for multi-select, single-select, and required fields. For more details on details for inputs, see More on inputs.
Give the input a descriptive name.
Add more inputs as needed by selecting Add an input.
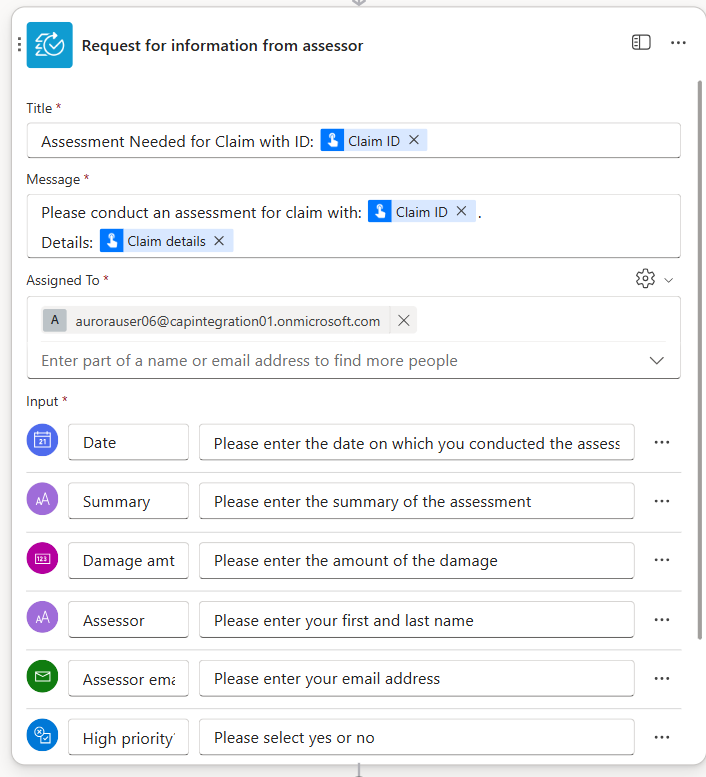
Here's an example of a fully configured request information action in an agent flow:
For workflows, this looks very similar.
Use parameters from request information in other actions
Every input that you specify in your request for information action produces a parameter that can be used in subsequent actions.
For example, in the previously shown configuration, all the parameters such
as Date, Summary, Damage amt., and others become available as dynamic
content that can be passed as input into subsequent actions.
In the example that follows, we use the parameters from the request for information action in a subsequent AI approval action:

At runtime, when the human responds to the request, the parameters are automatically populated with the values from their submission.
Run and test request information in your agent flow or workflow
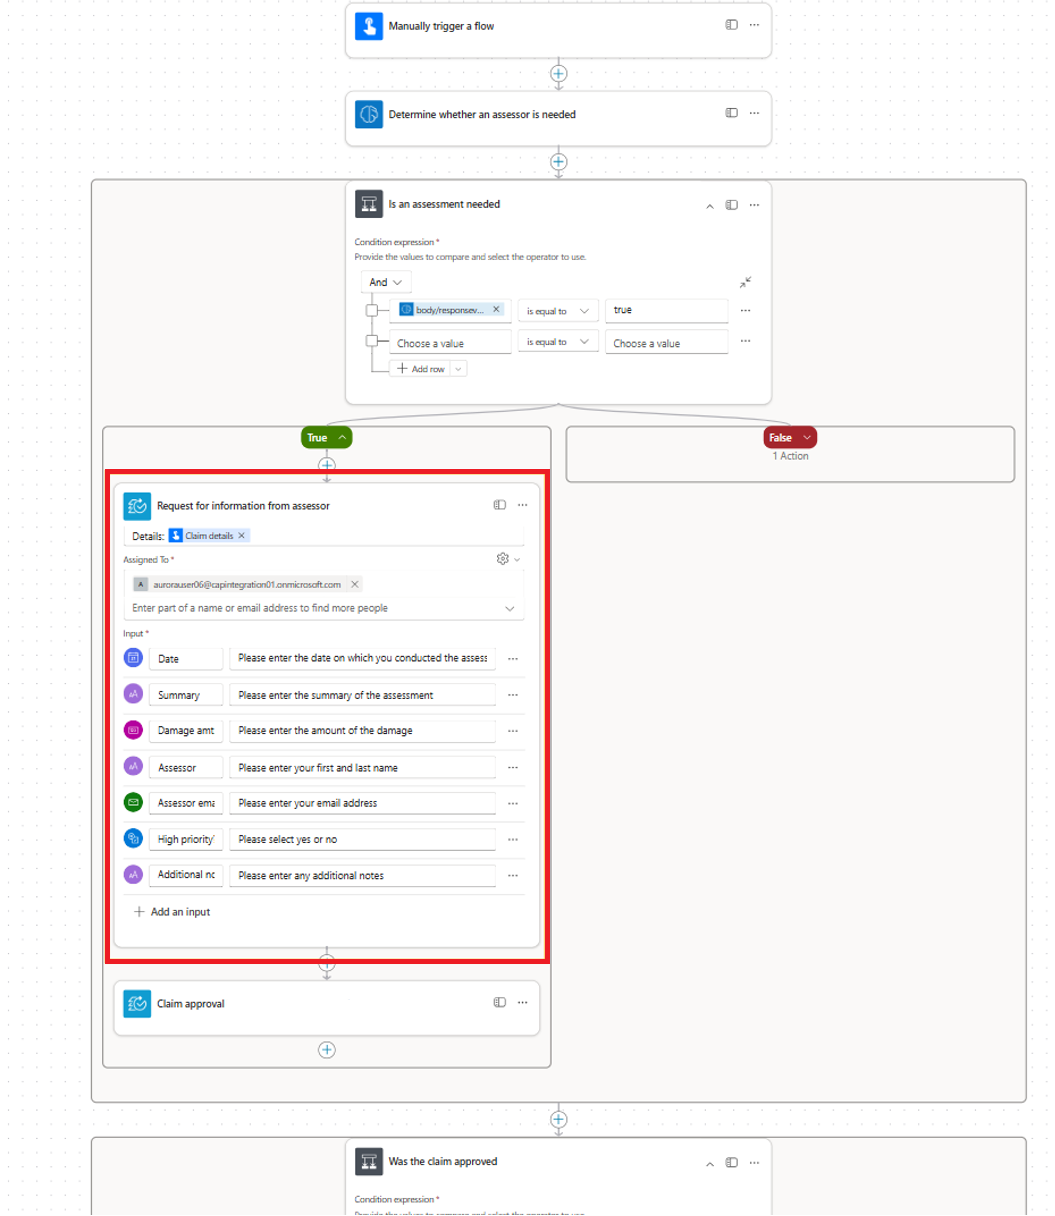
You now have a request for information action added to your agent flow or workflow. Now it's time to test it. Here's a snippet of a claim approval flow with the request for information action highlighted. We use this flow for demonstration purposes.
To test run your agent flow or workflow with the request information action, follow these steps:
Save and publish the agent flow.
Select Test to test run your flow.
The flow runs. When the flow reaches the request information action, it pauses execution and sends the request to the assigned humans via email through Outlook.
The following images show the relationship between the request configurations in the agent flow designer and the email received by the reviewer. Notice that the inputs specified in the agent flow designer in the first image correspond to the inputs being requested in the email as seen in the second image.


Within Outlook, the reviewer enters the responses to each of these fields and then selects Submit.
After the reviewer submits the responses, the flow resumes execution and continues with the remaining actions. As explained previously, the response data can be used in subsequent actions throughout the flow.
Note
Since requests are sent via Outlook, requests could be sent to users who are outside of the environment in which the agent flow was built.
For workflows, you can also test the Request for information node on its own without running the entire workflow. Learn more about how to do this in Test a single node in a workflow.
More on inputs
You have some flexibility in configuring your inputs. Here are some ways you can make inputs more flexible:
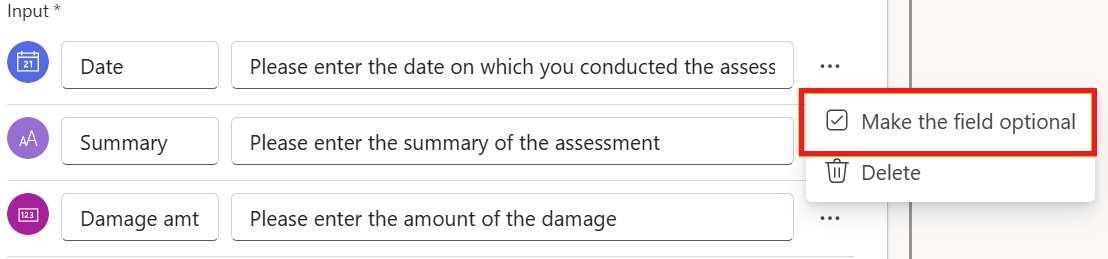
Make some inputs optional (all input types): When you send requests for information, you might want to make certain fields optional. In the designer, select the three dots (…) beside the input you added and select Make the field optional. When this request is sent, that input is optional for the assignee.
Placeholder text (all input types): You can customize the placeholder text that the assignee sees when they receive a request. Use this to provide additional information or hints on how the field should be completed.
To do so in the designer, select the field beside the name field of the input and customize the placeholder text. When the assignee receives the request, they see the corresponding placeholder text in each field. For example, in the image that follows, they would see: "Please enter the date on which you conducted the assessment."


Single-select options (text inputs): For text inputs, you can provide predefined options to assignees. These options can be configured as single-select, requiring the assignee to choose one option from the list.
To do so in the designer, select the three dots (…) beside the text input of your choice and select Add a drop-down list of options for agent flows or Add dropdown for workflows.

Add the options you want the assignee to choose from.

When the request is sent, the assignee can select one of the options from the list.
Multi-select options (text inputs): For text inputs, you can also provide predefined options that allow assignees to select multiple choices. Multi-select lets the assignee choose more than one option from the available list.
To do so in the designer, select the three dots (…) beside the text input of your choice and select Add a multi-select list of options for agent flows or Add multi-select for workflows.

Known issues
Occasionally, a request information action may return outputs wrapped in double braces ({{ }}) when referencing parameters in your flow. To avoid this, ensure that input names are configured without spaces.