This article explains how to deploy and configure an Elastic SAN.
Prerequisites
- If you're using Azure PowerShell, install the latest Azure PowerShell module.
- If you're using Azure CLI, install the latest version.
- After installing the latest version, run
az extension add -n elastic-san to install the extension for Elastic SAN.
Limitations
The following table contains the regions where Elastic SAN is currently available and the supported redundancy options.
| Redundancy options |
Regions |
| LRS only - with Availability Zone support |
India South |
| LRS and ZRS - with Availability Zone support |
Australia East
Brazil South
Canada Central
Central US, East US, East US 2, South Central US, West US 2, West US 3
East Asia, Southeast Asia
France Central
Germany West Central
India Central
Italy North
Japan East
Korea Central
Mexico Central
North Europe, West Europe
Norway East
Poland Central
Qatar Central
South Africa North
Spain Central
Sweden Central
Switzerland North
UAE North
UK South |
| LRS - no Availability Zone support (must use either the Azure PowerShell module or Azure CLI to deploy in these regions) |
Australia Central, Australia Central 2, Australia Southeast
Brazil Southeast
Canada East
France South
Germany North
Japan West
Korea South
Malaysia South
North Central US, West Central US, West US
Norway West
South Africa West
Sweden South
Switzerland West
Taiwan North
UAE Central
UK West |
Create the SAN
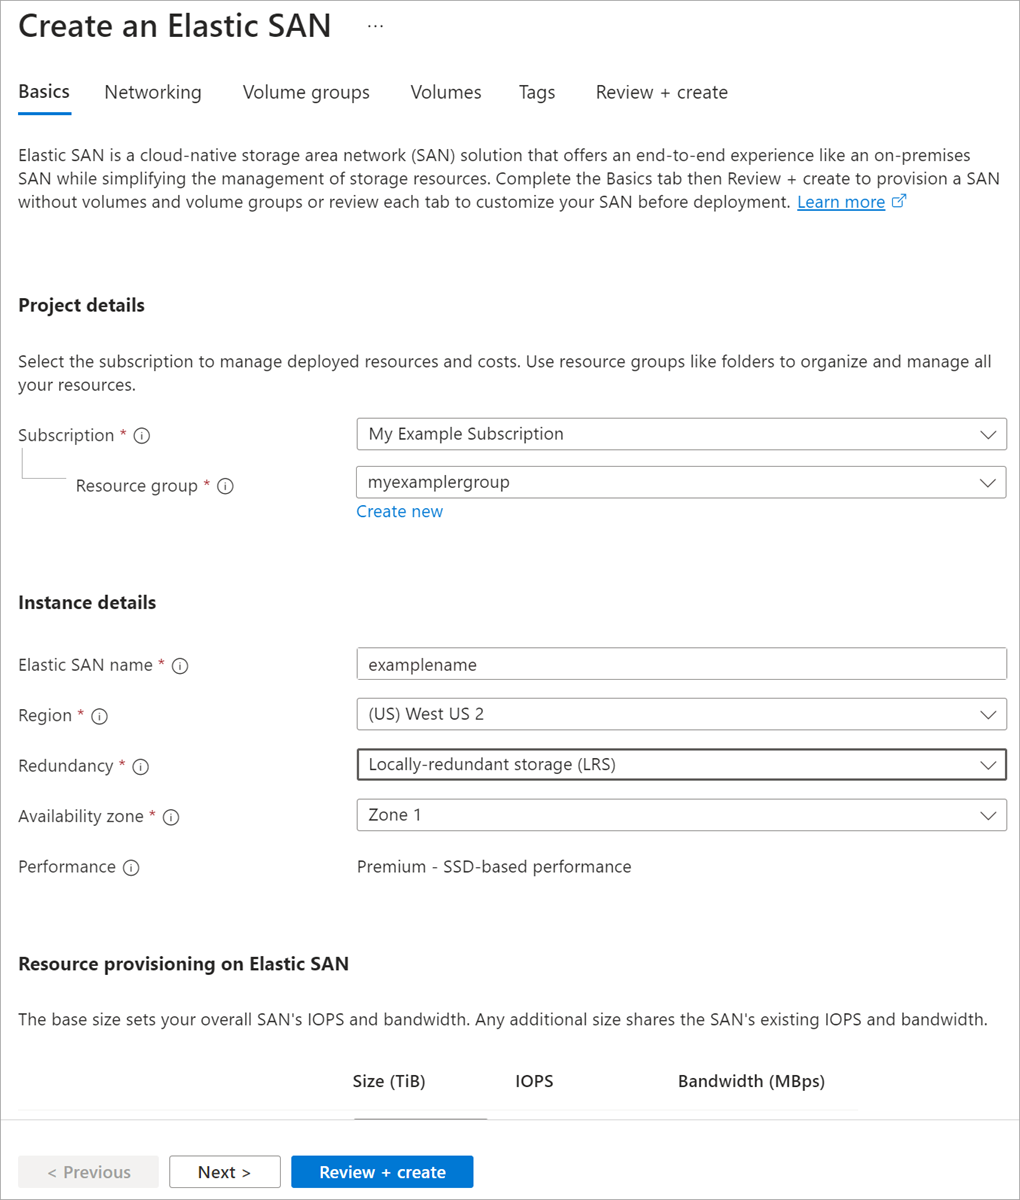
Sign in to the Azure portal and search for Elastic SAN.
Select + Create a new SAN.
On the basics page, fill in the appropriate values.
- Elastic SAN name must be between 3 and 24 characters long. The name can only contain lowercase letters, numbers, hyphens, underscores, and must begin and end with a letter or a number. Each hyphen and underscore must be preceded and followed by an alphanumeric character.
For best performance, your SAN should be in the same zone as your VM.
Specify the amount of base capacity you require, and any additional capacity, then select Next.
Increasing your SAN's base size also increases its IOPS and bandwidth. Increasing additional capacity only increases its total size (base + additional) but doesn't increase IOPS or bandwidth. However, increasing additional capacity is cheaper than increasing base.
Select Next.
Use one of these sets of sample code to create an Elastic SAN that uses locally redundant storage or zone-redundant storage. One set creates an elastic SAN with autoscaling enabled, and the other creates an elastic SAN with autoscaling disabled. Replace all placeholder text with your own values and use the same variables in all of the examples in this article:
| Placeholder |
Description |
<ResourceGroupName> |
The name of the resource group where the resources will be deployed. |
<ElasticSanName> |
The name of the Elastic SAN to be created.
The Elastic SAN name must be between 3 and 24 characters long. The name can only contain lowercase letters, numbers, hyphens and underscores, and must begin and end with a letter or a number. Each hyphen and underscore must be preceded and followed by an alphanumeric character. |
<ElasticSanVolumeGroupName> |
The name of the Elastic SAN Volume Group to be created. |
<VolumeName> |
The name of the Elastic SAN Volume to be created. |
<Location> |
The region where the new resources will be created. |
<Zone> |
The availability zone where the Elastic SAN will be created.
Specify the same availability zone as the zone that will host your workload.
Use only if the Elastic SAN will use locally redundant storage.
Must be a zone supported in the target location such as 1, 2, or 3. |
<BaseSizeTib> |
The amount of base units to provision. For PowerShell module Az.ElasticSan version 1.5.0 and newer, this is an optional parameter with default value 20. |
<ExtendedCapacitySizeTiB> |
The amount of capacity-only units to provision. For PowerShell module Az.ElasticSan version 1.5.0 and newer, this is an optional parameter with default value 0. |
<AutoScalePolicyEnforcement> |
The setting that determines whether autoscaling is enabled for the Elastic SAN.
This value is optional but if passed in, must be 'Enabled' or 'Disabled' |
<UnusedSizeTiB> |
The capacity (in TiB) on your Elastic SAN that you want to keep free and unused. If you use more space than this amount, the scale-up operation is automatically triggered, increasing the size of your SAN. This parameter is optional but is required to enable autoscaling. |
<IncreaseCapacityUnitByTiB> |
This parameter sets the TiB of additional capacity units that your SAN scales up by when autoscale gets triggered. This parameter is optional but is required to enable autoscaling. |
<CapacityUnitScaleUpLimit> |
This parameter sets the maximum capacity (size) that your SAN can grow to using autoscaling. Your SAN won't automatically scale past this size. This parameter is optional but is required to enable autoscaling. |
<-PublicNetworkAccess> |
This parameter allows or disallows public network access to ElasticSan. It's optional, but if passed in must be Enabled or Disabled. Enable if you're using service endpoints, disable if you're exclusively using private endpoints. |
The following command creates an Elastic SAN that uses locally redundant storage without autoscaling enabled.
# Define some variables.
$RgName     = "<ResourceGroupName>"
$EsanName   = "<ElasticSanName>"
$EsanVgName = "<ElasticSanVolumeGroupName>"
$VolumeName = "<VolumeName>"
$Location   = "<Location>"
$Zone       = <Zone>

# Connect to Azure
Connect-AzAccount

# Create the SAN.
New-AzElasticSAN -ResourceGroupName $RgName -Name $EsanName -AvailabilityZone $Zone -Location $Location -BaseSizeTib 100 -ExtendedCapacitySizeTiB 20 -SkuName Premium_LRS -PublicNetworkAccess Disabled
The following command creates an Elastic SAN that uses locally redundant storage with autoscaling enabled.
# Define some variables.
$RgName     = "<ResourceGroupName>"
$EsanName   = "<ElasticSanName>"
$EsanVgName = "<ElasticSanVolumeGroupName>"
$VolumeName = "<VolumeName>"
$Location   = "<Location>"
$Zone       = <Zone>
$AutoScalePolicyEnforcement = "Enabled"
$UnusedSizeTiB = <UnusedSizeTiB>
$IncreaseCapacityUnitByTiB = <IncreaseCapacityUnitByTiB>
$CapacityUnitScaleUpLimit = <CapacityUnitScaleUpLimit>

# Connect to Azure
Connect-AzAccount

# Create the SAN.
New-AzElasticSAN -ResourceGroupName $RgName -Name $EsanName -AvailabilityZone $Zone -Location $Location -BaseSizeTib 100 -ExtendedCapacitySizeTiB 20 -SkuName Premium_LRS -AutoScalePolicyEnforcement $AutoScalePolicyEnforcement -UnusedSizeTiB $UnusedSizeTiB -IncreaseCapacityUnitByTiB $IncreaseCapacityUnitByTiB -CapacityUnitScaleUpLimit $CapacityUnitScaleUpLimit -PublicNetworkAccess Disabled
The following command creates an Elastic SAN that uses zone-redundant storage, without enabling autoscale.
# Define some variables.
$RgName     = "<ResourceGroupName>"
$EsanName   = "<ElasticSanName>"
$EsanVgName = "<ElasticSanVolumeGroupName>"
$VolumeName = "<VolumeName>"
$Location   = "<Location>"

# Create the SAN
New-AzElasticSAN -ResourceGroupName $RgName -Name $EsanName -Location $Location -SkuName Premium_ZRS -PublicNetworkAccess Disabled
Use one of these sets of sample code to create an Elastic SAN that uses locally redundant storage or zone-redundant storage. One set creates an elastic SAN with autoscaling enabled, and the other creates an elastic SAN with autoscaling disabled. Replace all placeholder text with your own values and use the same variables in all of the examples in this article:
| Placeholder |
Description |
<ResourceGroupName> |
The name of the resource group where the resources will be deployed. |
<ElasticSanName> |
The name of the Elastic SAN to be created.
The Elastic SAN name must be between 3 and 24 characters long. The name can only contain lowercase letters, numbers, hyphens and underscores, and must begin and end with a letter or a number. Each hyphen and underscore must be preceded and followed by an alphanumeric character. |
<ElasticSanVolumeGroupName> |
The name of the Elastic SAN Volume Group to be created. |
<VolumeName> |
The name of the Elastic SAN Volume to be created. |
<Location> |
The region where the new resources will be created. |
<Zone> |
The availability zone where the Elastic SAN will be created.
Specify the same availability zone as the zone that will host your workload.
Use only if the Elastic SAN uses locally redundant storage.
Must be a zone supported in the target location such as 1, 2, or 3. |
<BaseSizeTib> |
The amount of base units to provision. For Azure CLI extension elastic-san versions 1.3.0 and newer, this is an optional parameter with default value 20. |
<ExtendedCapacitySizeTiB> |
The amount of capacity-only units to provision. For Azure CLI extension elastic-san versions 1.3.0 and newer, this is an optional parameter with default value 0. |
<AutoScalePolicyEnforcement> |
The setting that determines whether autoscaling is enabled for the Elastic SAN.
This value is optional but if passed in, must be 'Enabled' or 'Disabled' |
<UnusedSizeTiB> |
The capacity (in TiB) on your Elastic SAN that you want to keep free and unused. If you use more space than this amount, the scale-up operation is automatically triggered, increasing the size of your SAN. This parameter is optional but is required to enable autoscaling. |
<IncreaseCapacityUnitByTiB> |
This parameter sets the TiB of additional capacity units that your SAN scales up by when autoscale gets triggered. This parameter is optional but is required to enable autoscaling. |
<CapacityUnitScaleUpLimit> |
This parameter sets the maximum capacity (size) that your SAN can grow to using autoscaling. Your SAN won't automatically scale past this size. This parameter is optional but is required to enable autoscaling. |
<CapacityUnitScaleUpLimit> |
This parameter sets the maximum capacity (size) that your SAN can grow to using autoscaling. Your SAN won't automatically scale past this size. This parameter is optional but is required to enable autoscaling. |
<public-network-access> |
This parameter allows or disallows public network access to ElasticSan. It's optional, but if passed in must be Enabled or Disabled. Enable if you're using service endpoints, disable if you're exclusively using private endpoints. |
The following command creates an Elastic SAN that uses locally redundant storage without autoscaling enabled.
# Define some variables.
RgName="<ResourceGroupName>"
EsanName="<ElasticSanName>"
EsanVgName="<ElasticSanVolumeGroupName>"
VolumeName="<VolumeName>"
Location="<Location>"
Zone=<Zone>

# Connect to Azure
az login

# Create an Elastic SAN
az elastic-san create -n $EsanName -g $RgName -l $Location --sku "{name:Premium_LRS,tier:Premium}" --availability-zones $Zone
The following command creates an Elastic SAN that uses locally redundant storage with autoscaling enabled.
# Define some variables.
RgName="<ResourceGroupName>"
EsanName="<ElasticSanName>"
EsanVgName="<ElasticSanVolumeGroupName>"
VolumeName="<VolumeName>"
Location="<Location>"
Zone=<Zone>
AutoScalePolicyEnforcement="Enabled"
UnusedSizeTiB="<UnusedSizeTiB>"
IncreaseCapacityUnitByTiB="<IncreaseCapacityUnitByTiB>"
CapacityUnitScaleUpLimit="<CapacityUnitScaleUpLimit>"

# Connect to Azure
az login

# Create an Elastic SAN
az elastic-san create -n $EsanName -g $RgName -l $Location --base-size-tib 100 --extended-capacity-size-tib 20 --sku "{name:Premium_LRS,tier:Premium}" --availability-zones $Zone --auto-scale-policy-enforcement $AutoScalePolicyEnforcement --unused-size-tib $UnusedSizeTiB --increase-capacity-unit-by-tib $IncreaseCapacityUnitByTiB --capacity-unit-scale-up-limit $CapacityUnitScaleUpLimitTiB
The following command creates an Elastic SAN that uses zone-redundant storage, with autoscaling disabled.
# Define some variables.
RgName="<ResourceGroupName>"
EsanName="<ElasticSanName>"
EsanVgName="<ElasticSanVolumeGroupName>"
VolumeName="<VolumeName>"
Location="<Location>"

az elastic-san create -n $EsanName -g $RgName -l $Location --base-size-tib 100 --extended-capacity-size-tib 20 --sku "{name:Premium_ZRS,tier:Premium}"
Create volume groups
After you configure the basic settings and provision your storage, create volume groups. Use volume groups to manage volumes at scale. Any settings or configurations you apply to a volume group apply to all volumes associated with that volume group.
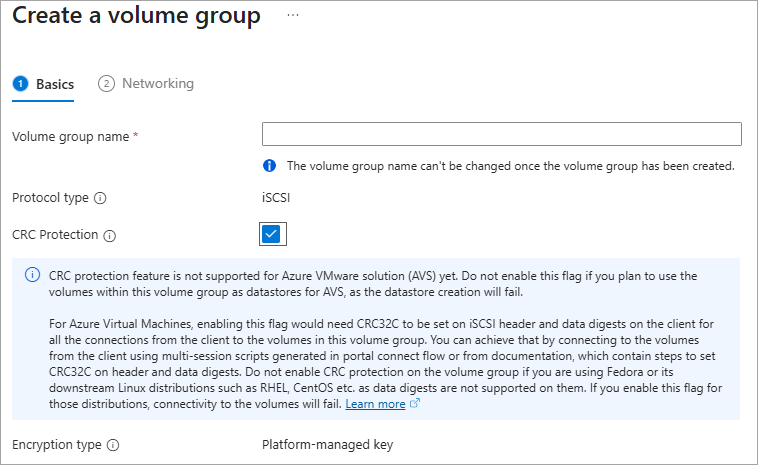
Select + Create volume group and enter a name for your volume group.
- The name must be between 3 and 63 characters long. The name can only contain lowercase letters, numbers, hyphens, and it must begin and end with a letter or a number. Each hyphen must be preceded and followed by an alphanumeric character. You can't change the volume group name after you create it.
Generally, you should enable CRC Protection, unless you're going to connect this volume group to Azure VMware Solution or are connecting to the volume group with clients using Fedora or its downstream Linux distributions such as RHEL, CentOS, etc.
Note
CRC protection isn't currently available in North Europe and South Central US.
Select Next : Volumes.
The following sample command creates an Elastic SAN volume group in the Elastic SAN you created previously. Use the same variables and values you defined when you created the Elastic SAN.
Important
The -EnforceDataIntegrityCheckForIscsi parameter determines whether CRC protection is enabled. Generally, you should enable it, unless you're connecting this volume group to Azure VMware Solution, or connecting to the volume group with clients using Fedora or its downstream Linux distributions such as RHEL, CentOS, or similar distributions. The script has it disabled. Set the value to $true if you want to enable it.
CRC protection isn't currently available in North Europe and South Central US.
# Create the volume group, this script only creates one.
New-AzElasticSanVolumeGroup -ResourceGroupName $RgName -ElasticSANName $EsanName -Name $EsanVgName -EnforceDataIntegrityCheckForIscsi $false
The following sample command creates an Elastic SAN volume group in the Elastic SAN you created previously. Use the same variables and values you defined when you created the Elastic SAN.
Important
The --data-integrity-check parameter determines whether CRC protection is enabled. Generally, you should enable it, unless you're going to connect this volume group to Azure VMware Solution, or are connecting to the volume group with clients using Fedora or its downstream Linux distributions such as RHEL, CentOS, or similar distributions. The sample command has it disabled. Set the parameter to true if you want to enable it.
CRC protection isn't currently available in North Europe and South Central US.
az elastic-san volume-group create --elastic-san-name $EsanName -g $RgName -n $EsanVgName --data-integrity-check false
Create volumes
Now that you configured the SAN itself and created at least one volume group, you can create volumes.
Volumes are usable partitions of the SAN's total capacity. You must allocate a portion of that total capacity as a volume in order to use it. You can only mount and use the actual volumes, not volume groups.
Create volumes by entering a name, selecting an appropriate volume group, and entering the capacity you'd like to allocate for your volume.
The volume name is part of your volume's iSCSI Qualified Name, and you can't change it once created.
Select Review + create and deploy your SAN.

The following sample command creates a single volume in the Elastic SAN volume group you created previously. To create a batch of volumes, see Create multiple Elastic SAN volumes. Use the same variables and values you defined when you created the Elastic SAN.
Important
You can't change the volume name after you create it because it's part of the volume's iSCSI Qualified Name.
Use the same variables, and then run the following script:
# Create the volume, this command only creates one.
New-AzElasticSanVolume -ResourceGroupName $RgName -ElasticSanName $EsanName -VolumeGroupName $EsanVgName -Name $VolumeName -sizeGiB 2000
Important
You can't change the volume name after you create it because it's part of the volume's iSCSI Qualified Name.
The following sample command creates an Elastic SAN volume in the Elastic SAN volume group you created previously. Use the same variables and values you defined when you created the Elastic SAN.
az elastic-san volume create --elastic-san-name $EsanName -g $RgName -v $EsanVgName -n $VolumeName --size-gib 2000
Next steps
Now that you deployed an Elastic SAN, configure its networking by using either private endpoints or service endpoints.
