Note
Access to this page requires authorization. You can try signing in or changing directories.
Access to this page requires authorization. You can try changing directories.
APPLIES TO:
 Cassandra
Important
Are you looking for a database solution for high-scale scenarios with a 99.999% availability service level agreement (SLA), instant autoscale, and automatic failover across multiple regions? Consider Azure Cosmos DB for NoSQL.
Are you looking to migrate an existing Apache Cassandra application? Consider Azure Managed Instance for Apache Cassandra.
The Striim image in the Azure marketplace offers continuous real-time data movement from data warehouses and databases to Azure. While moving the data, you can perform in-line denormalization, data transformation, enable real-time analytics, and data reporting scenarios. It's easy to get started with Striim to continuously move enterprise data to Azure Cosmos DB for Apache Cassandra. Azure provides a marketplace offering that makes it easy to deploy Striim and migrate data to Azure Cosmos DB.
This article shows how to use Striim to migrate data from an Oracle database to an Azure Cosmos DB for Apache Cassandra account.
Prerequisites
If you don't have an Azure subscription, create a free account before you begin.
An Oracle database running on-premises with some data in it.
Deploy the Striim marketplace solution
Sign in to the Azure portal.
Select Create a resource and search for Striim in the Azure Marketplace. Select the first option and Create.
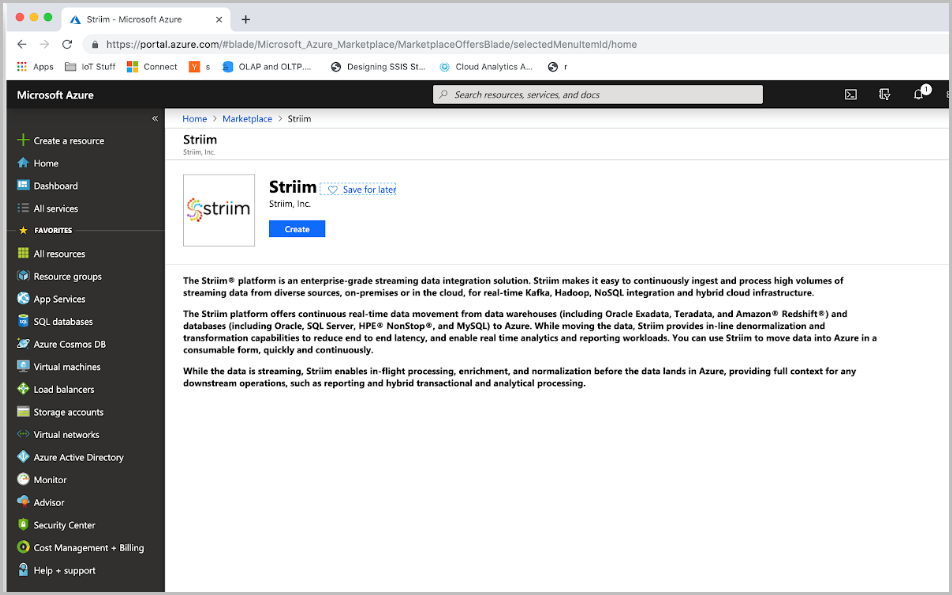
Next, enter the configuration properties of the Striim instance. The Striim environment is deployed in a virtual machine. From the Basics pane, enter the VM user name and VM password (this password is used to SSH into the VM). Select your Subscription, Resource Group, and the Location where you want to deploy Striim. When you're done, select OK.

In the Striim Cluster settings pane, choose the type of Striim deployment and the virtual machine size.
Setting Value Description Striim deployment type Standalone Striim can run in Standalone or Cluster deployment types. The Standalone mode deploys the Striim server on a single virtual machine. You can select the size of the VMs depending on your data volume. The Cluster mode deploys the Striim server on two or more VMs with the selected size. Cluster environments that have more than two nodes offer automatic high availability and failover.
In this tutorial, you can select the Standalone option. Use the default Standard_F4s VM.Name of the Striim cluster <Striim_cluster_Name> Name of the Striim cluster. Striim cluster password <Striim_cluster_password> Password for the cluster. After you fill the form, select OK to continue.
In the Striim access settings pane, configure the Public IP address (choose the default values), Domain name for Striim, and Admin password that you want to use to sign in to the Striim UI. Configure a virtual network and subnet. (Choose the default values.) After you provide the details, select OK to continue.

Azure validates the deployment and makes sure everything looks good. Validation takes a few minutes to complete. After the validation finishes, select OK.
Finally, review the terms of use and select Create to create your Striim instance.
Configure the source database
In this section, you configure the Oracle database as the source for data movement. Striim server includes the Oracle JDBC driver that it uses to connect to Oracle. To read changes from your source Oracle database, you can use either the LogMiner or the XStream APIs. The Oracle JDBC driver is in Striim's Java classpath to read, write, or persist data from Oracle database.
Configure target database
In this section, you configure the Azure Cosmos DB for Apache Cassandra account as the target for data movement.
Create an Azure Cosmos DB for Apache Cassandra account by using the Azure portal.
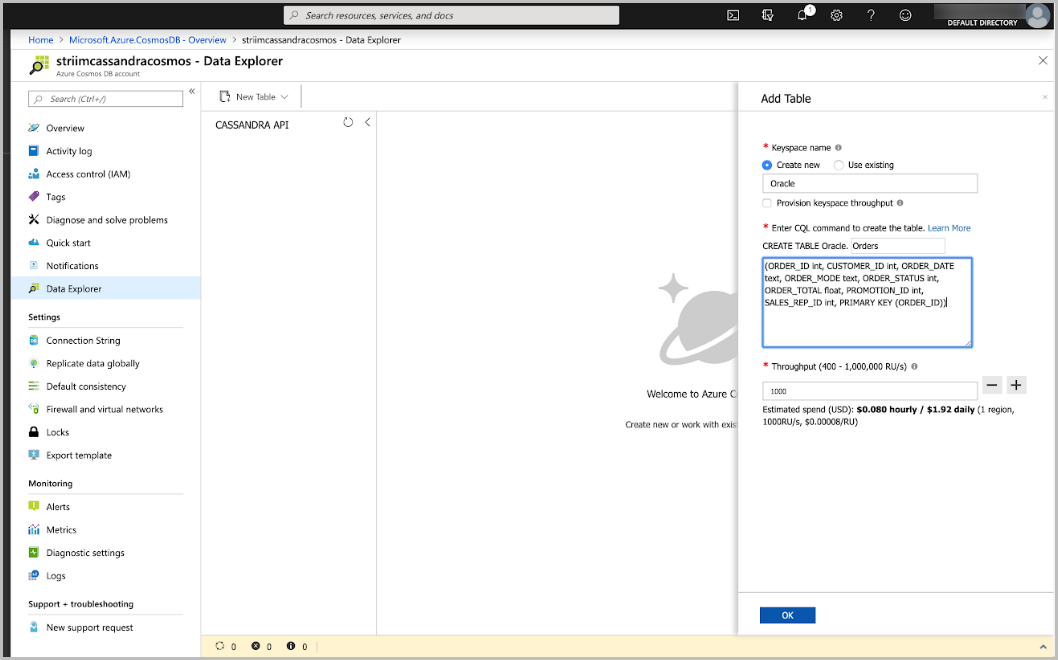
Go to the Data Explorer pane in your Azure Cosmos DB account. Select New Table to create a new container. Assume that you're migrating products and orders data from Oracle database to Azure Cosmos DB. Create a new keyspace named StriimDemo with an Orders container. Provision the container with 1,000 RUs (this example uses 1,000 RUs, but you should use the throughput estimated for your workload), and /ORDER_ID as the primary key. These values will differ depending on your source data.
Configure Oracle to Azure Cosmos DB data flow
In the Azure portal, go to the Striim instance that you deployed. Select Connect in the upper menu bar. From the SSH tab, copy the URL in the Login using VM local account field.

Open a new terminal window and run the SSH command you copied from the Azure portal. This article uses terminal in a macOS. You can follow similar instructions by using an SSH client on a Windows machine. When prompted, type yes to continue and enter the password you set for the virtual machine in the previous step.

From the same terminal window, restart the Striim server by running the following commands:
systemctl stop striim-node
systemctl stop striim-dbms
systemctl start striim-dbms
systemctl start striim-node
Striim takes a minute to start up. If you want to see the status, run the following command:
tail -f /opt/striim/logs/striim-node.logNow, go back to Azure and copy the public IP address of your Striim VM.

To go to the Striim Web UI, open a new tab in a browser and copy the public IP followed by
:9080. Sign in by using the admin username, along with the admin password you specified in the Azure portal.
Now you arrive at Striim’s home page. There are three different panes – Dashboards, Apps, and SourcePreview. The Dashboards pane allows you to move data in real time and visualize it. The Apps pane contains your streaming data pipelines, or data flows. On the right side of the page is SourcePreview, where you can preview your data before moving it.
Select the Apps pane. You'll focus on this pane for now. There are a variety of sample apps that you can use to learn about Striim. However, in this article, you create your own. Select Add App in the upper right corner.

There are a few different ways to create Striim applications. Select Start from Scratch for this scenario.
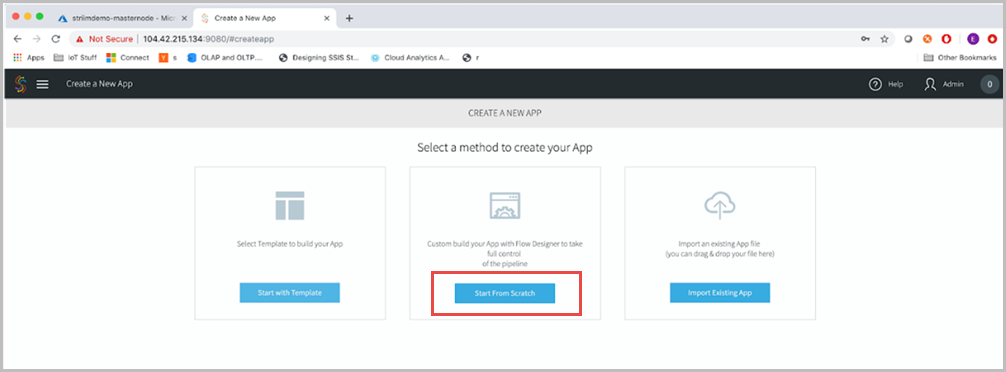
Enter a friendly name for your application, such as oraToCosmosDB, and select Save.

You arrive at the Flow Designer, where you can drag and drop out of the box connectors to create your streaming applications. Type Oracle in the search bar, and drag and drop the Oracle CDC source onto the app canvas.

Enter the source configuration properties of your Oracle instance. The source name is just a naming convention for the Striim application. You can use a name such as src_onPremOracle. Also enter other details like Adapter type, connection URL, username, password, and table name. Select Save to continue.

Select the wave icon of the stream to connect the target Azure Cosmos DB instance.

Before configuring the target, make sure you add a Baltimore root certificate to Striim's Java environment.
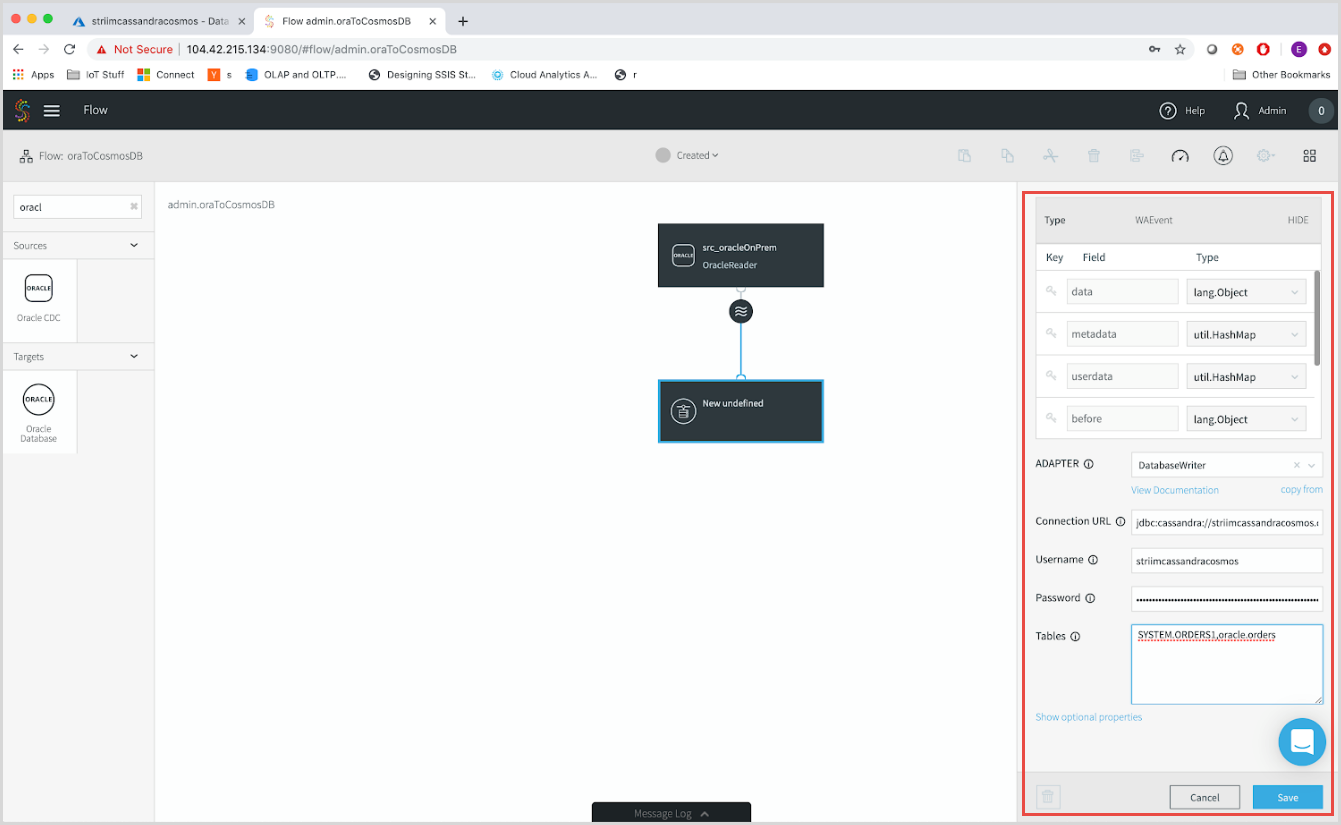
Enter the configuration properties of your target Azure Cosmos DB instance and select Save to continue. Here are the key parameters to note:
Adapter - Use DatabaseWriter. When you write to Azure Cosmos DB for Apache Cassandra, DatabaseWriter is required. The Cassandra driver 3.6.0 is bundled with Striim. If the DatabaseWriter exceeds the number of RUs provisioned on your Azure Cosmos DB container, the application crashes.
Connection URL - Specify your Azure Cosmos DB JDBC connection URL. The URL is in the format
jdbc:cassandra://<contactpoint>:10350/<databaseName>?SSL=trueUsername - Specify your Azure Cosmos DB account name.
Password - Specify the primary key of your Azure Cosmos DB account.
Tables - Target tables must have primary keys, and you can't update primary keys.

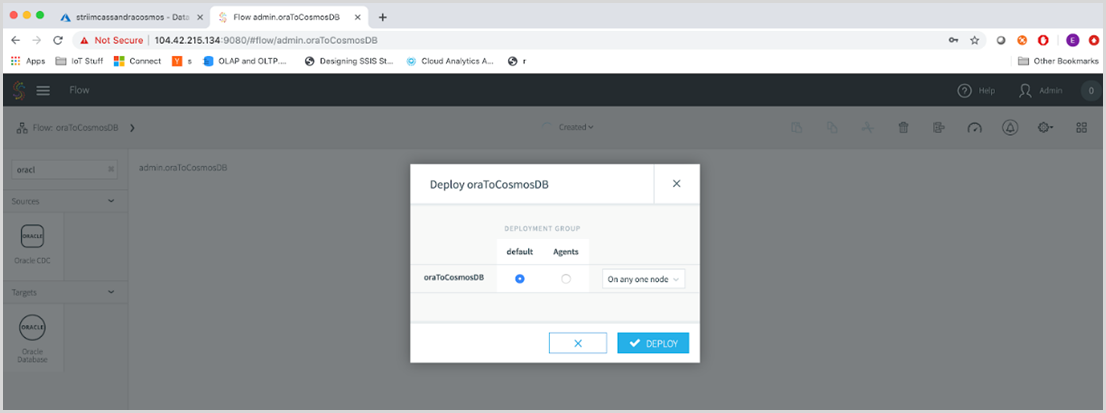
Now, run the Striim application. In the upper menu bar, select Created, and then select Deploy App. In the deployment window, you can specify if you want to run certain parts of your application on specific parts of your deployment topology. Since you're running in a simple deployment topology through Azure, use the default option.
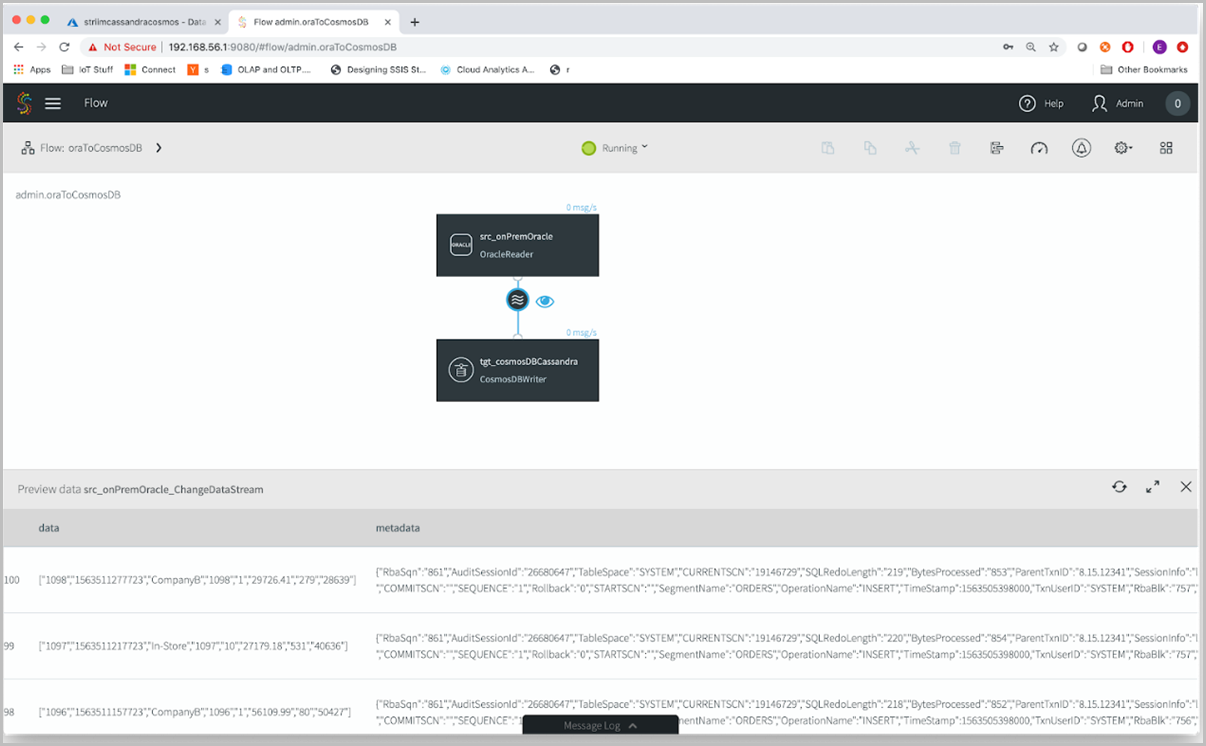
After deploying, preview the stream to see data flowing through Striim. Select the wave icon and the eyeball next to it. Select the Deployed button in the top menu bar, and then select Start App.

By using a CDC (Change Data Capture) reader, Striim picks up only new changes on the database. If you have data flowing through your source tables, you see it. However, since this is a sample table, the source isn't connected to any application. If you use a sample data generator, you can insert a chain of events into your Oracle database.
You see data flowing through the Striim platform. Striim picks up all the metadata associated with your table as well, which is helpful to monitor the data and make sure that the data lands on the right target.
Finally, sign into Azure and go to your Azure Cosmos DB account. Refresh the Data Explorer, and you can see that data has arrived.
By using the Striim solution in Azure, you can continuously migrate data to Azure Cosmos DB from various sources such as Oracle, Cassandra, MongoDB, and various others to Azure Cosmos DB. To learn more, visit the Striim website, download a free 30-day trial of Striim, and for any issues when setting up the migration path with Striim, file a support request.
Next steps
To migrate data to Azure Cosmos DB for NoSQL, see how to migrate data to API for Cassandra account using Striim