Note
Access to this page requires authorization. You can try signing in or changing directories.
Access to this page requires authorization. You can try changing directories.
Autoscale automatically scales your applications or resources based on demand. Use autoscale to provision enough resources to support the demand on your application without overprovisioning and incurring unnecessary costs.
This article describes how to configure the autoscale settings for your resources in the Azure portal.
Azure autoscale supports many resource types. For more information about supported resources, see supported services for autoscale.
Prerequisites
Before you begin, make sure you have the following prerequisites:
- An Azure account with an active subscription. Create an account for free.
- A resource that supports autoscale. This walkthrough uses an App Service plan associated with a web app. To create one, see Create an ASP.NET web app in Azure. For the full list of supported resource types, see supported services for autoscale.
- Permissions to configure autoscale on the target resource. The Owner or Contributor role, or a custom role with
Microsoft.Insights/autoscaleSettings/*permissions, grants the required access.
Discover the autoscale settings in your subscription
To discover the resources available for autoscale, follow these steps.
Open the Azure portal.
Search for and select Azure Monitor using the search bar at the top of the page.
Select Autoscale to view all the resources for which autoscale is applicable, along with their current autoscale status.
Use the filter pane at the top to select resources in a specific resource group, resource types, or a specific resource.

The page shows the instance count and the autoscale status for each resource. Autoscale statuses are:
- Not configured: Autoscale isn't set up yet for this resource.
- Enabled: Autoscale is enabled for this resource.
- Disabled: Autoscale is disabled for this resource.
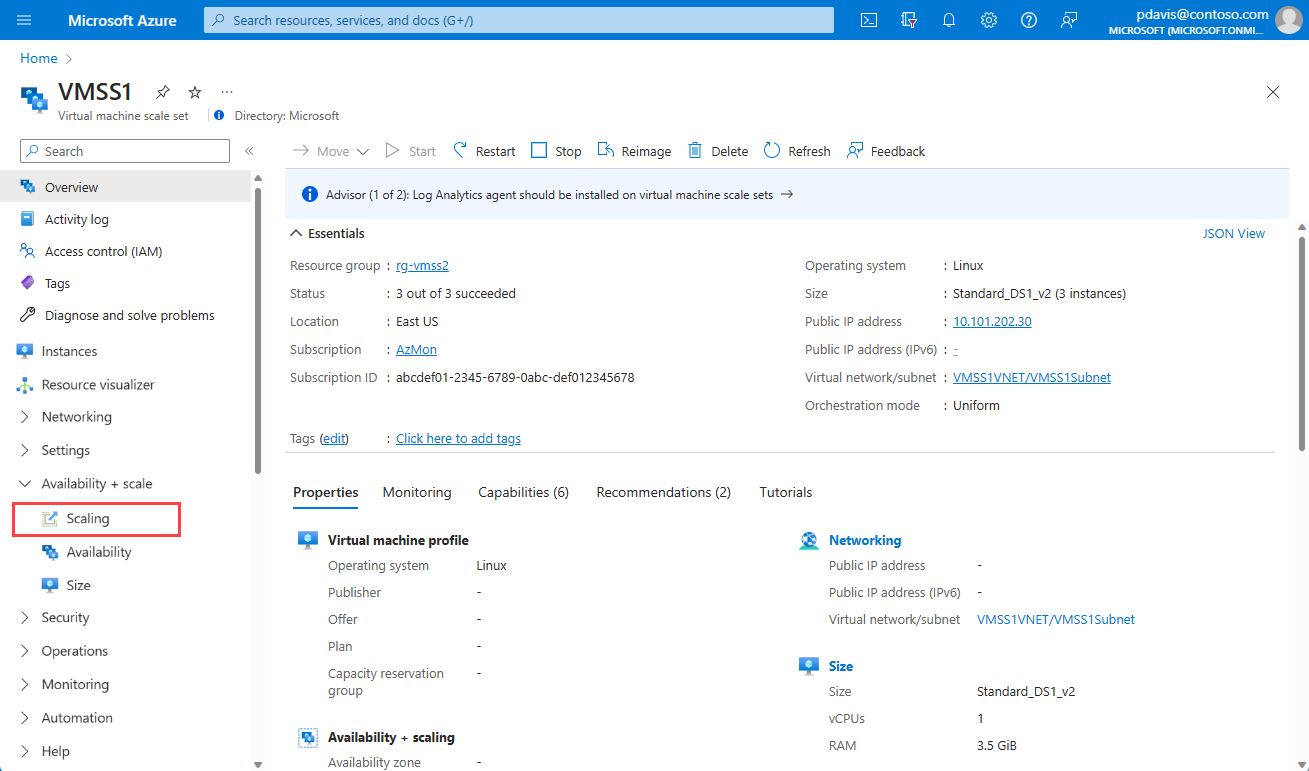
You can also reach the scaling page by selecting Scaling from the Settings menu for each resource.

Create your first autoscale setting
Note
In addition to the autoscale instructions in this article, Azure App Service offers automatic scaling. For more information about this capability, see automatic scaling.
The following steps use the Azure portal. To create autoscale settings programmatically, use Azure PowerShell, the Azure CLI, an Azure Resource Manager template, or the REST API.
Follow these steps to create your first autoscale setting.
Open the Autoscale pane in Azure Monitor and select a resource to scale. The following steps use an App Service plan associated with a web app. To create one, see Create an ASP.NET web app in Azure.
The current instance count is 1. Select Custom autoscale.
Enter a Name and Resource group or use the default.
Select Scale based on a metric.
Select Add a rule to open a context pane on the right side.

The default rule scales your resource by one instance if the
Percentage CPUmetric is greater than 70 percent. Keep the default operator (Greater than), threshold (70), and operation (Increase count by 1), and then select Add.You've created your first scale-out rule. Best practice is to have at least one scale-in rule. To add another rule, select Add a rule.
Set Operator to Less than.
Set Metric threshold to trigger scale action to 20.
Set Operation to Decrease count by.
Select Add.

You have configured a scale setting that scales out and scales in based on CPU usage, but you're still limited to a maximum of one instance. Change the instance limits to allow for more instances.
Under Instance limits set Maximum to 3
Select Save.


You have successfully created your first scale setting to autoscale your web app based on CPU usage. When CPU usage is greater than 70%, an additional instance is added, up to a maximum of 3 instances. When CPU usage is below 20%, an instance is removed up to a minimum of 1 instance. By default there will be 1 instance.
Scheduled scale conditions
The default scale condition defines the scale rules that are active when no other scale condition is in effect. Add scale conditions that are active on a given date and time, or that recur on a weekly basis.
Scale based on a repeating schedule
Set your resource to scale to a single instance on a Sunday.
Select Add a scale condition.
Enter a description for the scale condition.
Select Scale to a specific instance count. Alternatively, scale based on metrics and thresholds that are specific to this scale condition.
Enter 1 in the Instance count field.
Select Repeat specific days.
Select Sunday
Set the Start time and End time for when the scale condition should be applied. Outside of this time range, the default scale condition applies.
Select Save

You have now defined a scale condition that reduces the number of instances of your resource to 1 every Sunday.
Scale differently on specific dates
Set autoscale to scale differently for specific dates, when you expect an unusual level of demand for the service.
Select Add a scale condition.
Select Scale based on a metric.
Select Add a rule to define your scale-out and scale-in rules. Configure a scale-out rule that increases the instance count by 1 when
Percentage CPUis greater than 70 percent, and a scale-in rule that decreases the instance count by 1 whenPercentage CPUis less than 20 percent, matching the default condition.Set the Maximum instance limit to 10
Set the Default instance limit to 3
Select Specify start/end dates
Enter the Start date and End date for when the scale condition should be applied.
Select Save

You have now defined a scale condition for a specific day. When CPU usage is greater than 70%, an additional instance is added, up to a maximum of 10 instances to handle anticipated load. When CPU usage is below 20%, an instance is removed up to a minimum of 1 instance. By default, autoscale scales to 3 instances when this scale condition becomes active.
Additional settings
View the history of your resource's scale events
Whenever your resource has any scaling event, the activity log records it. You can view the history of the scale events in the Run history tab.

View the scale settings for your resource
Autoscale is an Azure Resource Manager resource. Like other resources, you can view the resource definition in JSON format. To view the autoscale settings in JSON, select the JSON tab.

Make changes directly in JSON if necessary. These changes take effect after you save them.
Predictive autoscale
Predictive autoscale uses machine learning to help manage and scale Azure Virtual Machine Scale Sets with cyclical workload patterns. It forecasts the overall CPU load to your Virtual Machine Scale Set, based on your historical CPU usage patterns. It predicts the overall CPU load by observing and learning from historical usage. This process ensures that scale-out occurs in time to meet the demand. For more information, see Use predictive autoscale to scale out before load demands.
Scale-in policy
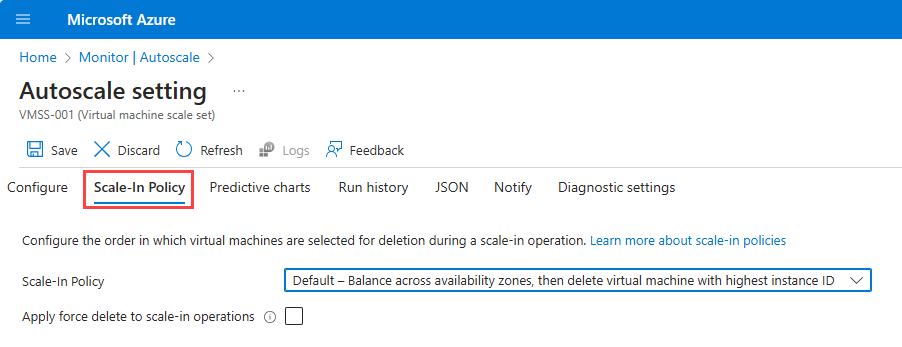
When scaling a Virtual Machine Scale Set, the scale-in policy determines which virtual machines are selected for removal when a scale-in event occurs. Set the scale-in policy to Default, NewestVM, or OldestVM. For more information, see Use custom scale-in policies with Azure Virtual Machine Scale Sets.
Notify
Configure notifications to send when a scale event occurs. Send notifications to an email address or to a webhook. For more information, see autoscale notifications.
Cool-down period effects
Autoscale uses a cool-down period. This period is the amount of time to wait after a scale operation before scaling again. The cool-down period allows the metrics to stabilize and avoids scaling more than once for the same condition. Cool-down applies to both scale-in and scale-out events. The default cool-down period is five minutes. For example, if you set the cool-down to 10 minutes and autoscale just scaled in, autoscale doesn't attempt to scale again for another 10 minutes in either direction. For more information, see autoscale evaluation steps.
Flapping
Flapping refers to a loop condition that causes a series of opposing scale events. Flapping happens when one scale event triggers an opposite scale event. For example, scaling in reduces the number of instances causing the CPU to rise in the remaining instances. This condition triggers a scale-out event, which causes CPU usage to drop, repeating the process. For more information, see Flapping in autoscale and Troubleshoot autoscale.
Clean up autoscale settings
To stop autoscale on a resource, open the Autoscale pane for the resource, select Manual scale, set the instance count, and select Save. Manual scale removes the autoscale rules and returns the resource to a fixed instance count.
Move autoscale to a different region
This section describes how to move Azure autoscale to another region under the same subscription and resource group. Use the REST API to move autoscale settings.
Prerequisites
- Ensure that the subscription and resource group are available and the details in both the source and destination regions are identical.
- Ensure that Azure autoscale is available in the Azure region you want to move to.
Move
Use REST API to create an autoscale setting in the new environment. The autoscale setting created in the destination region is a copy of the autoscale setting in the source region.
You can't move diagnostic settings that you created in association with the autoscale setting in the source region. You need to re-create diagnostic settings in the destination region after you create the autoscale settings.
Learn more about moving resources across Azure regions
To learn more about moving resources between regions and disaster recovery in Azure, see Move resources to a new resource group or subscription.